How to seal a sump pit lid: gasket, caulk, valve
A gasketed lid, sealed penetrations and a check valve stop soil gas rising through the pit. How to measure the basin, seal the pipe and keep the pump working.
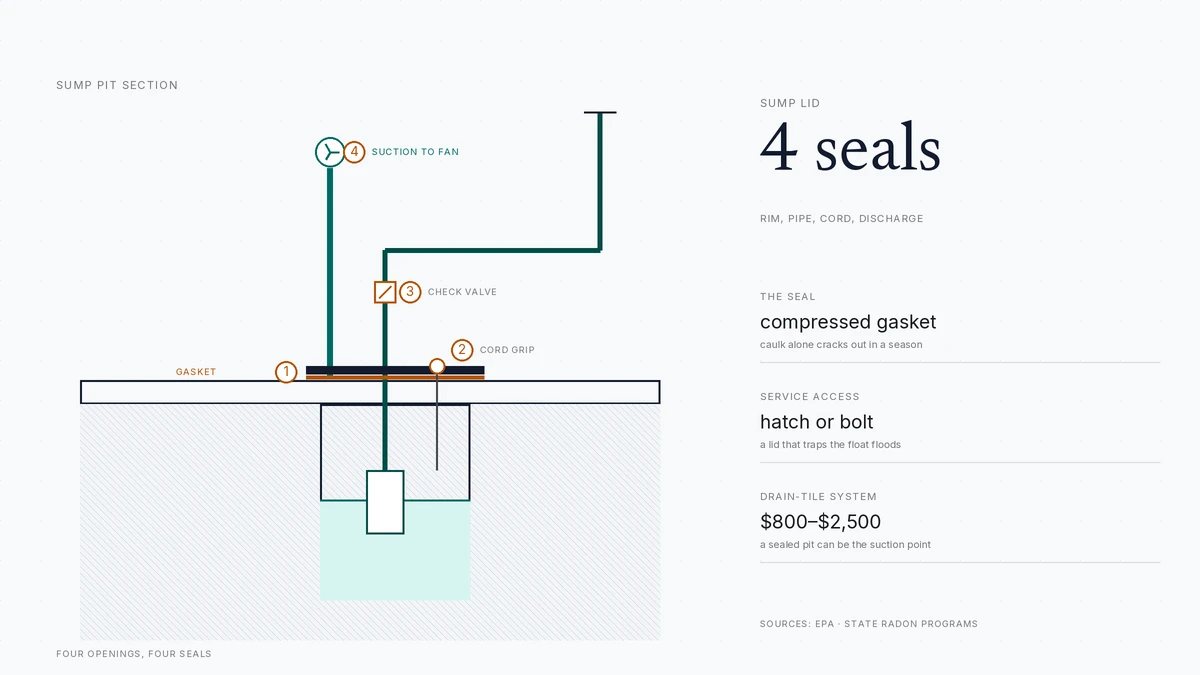
Seal a sump pit lid with a compressible gasket clamped against a flat rim, then close every penetration: discharge pipe, pump cord and any drain inlet. Fit a check valve above the lid and keep the float free. A lid that traps the float is worse than none.
- The seal
- Compressed gasket on a flat rim
- Also required
- Sealed pipe and cord ports
- Check valve
- Above the lid, on the discharge
- Drain-tile system
- $800–$2,500 installed
Some links on this page are affiliate links.If you buy through them we may earn a commission at no extra cost to you. We do not accept payment for rankings. Read the full disclosure.
| Gasketed lid | Caulked cover | |
|---|---|---|
| How it seals | Compressed gasket against a flat rim | Adhesive bead along the joint |
| Service access | Fasteners or a hatch come off cleanly | Seal is destroyed to reach the pump |
| Life of the seal | Years, if the rim is sound | One season before it cracks |
| Penetrations | Grommets and cord grips | Often left open or filled with putty |
| Radon result | Pit can hold vacuum as a suction point | Leaks under suction; fan pulls room air |
Sealing a sump pit lid means closing the largest unsealed opening in many basement floors so soil gas cannot rise through it. The lid has to compress a gasket against a flat rim, every hole in it has to be sealed, and the pump has to remain reachable. Done properly, it takes an afternoon and a few parts; done badly, it traps the float and floods the basement.
What the seal has to do
A sump pit is a hole in the slab, and under the slab is soil. Drain tile runs into that hole, which means the basin is connected to the same gravel bed radon moves through. With a loose lid, the pit is a chimney: gas rises through the tile, into the basin and out into the basement air, pushed by the small pressure difference a heated house creates.
Two jobs follow from that. The lid has to stop gas escaping into the room, and it has to hold up if the pit is later tied into a radon system as a suction point. Both requirements point at the same thing: a seal that compresses, rather than one that merely covers.
Start with a gasketed lid
The mechanism is simple. A rigid lid presses a compressible gasket against a flat surface, and fasteners hold it there. A lid resting on a rough rim by its own weight leaks at the gap, and under suction it lifts.
Look for three properties. A gasket that is still compressible, not a foam strip that has taken a permanent set. Fasteners spaced around the perimeter so the load is even. And a rim sound enough to seal against, because a crumbling basin lip will not hold anything until it is repaired.
Size matters as much as material. A lid that is close but not exact will sit on the rim at one edge and hover at the other, and no amount of clamping closes that gap evenly.
Caulk is a backup, not the seal
A bead of sealant around a gasket helps on a slightly uneven rim. A bed of sealant with no gasket is a temporary fix that fails as the lid and the basin move at different rates through the seasons.
The bigger problem is service. A caulked lid has to be cut free to reach the pump, and it never goes back the same way. A gasketed lid comes off with a wrench and goes back with the same gasket, which is the difference between a maintained pit and a sealed one nobody wants to open.
Seal the pipe and cord penetrations
Every hole in the lid is a leak unless it is closed. The discharge pipe needs a grommet or a bulkhead fitting sized to the pipe. The pump cord needs a sealed cord grip, not a notch cut with a knife. Any drain tile inlet needs its own plug or seal.
This is where most installations fail. A lid with a good gasket and three open penetrations is not airtight, and the leak is invisible until a manometer shows the vacuum pulling room air through the pit instead of soil gas from under the slab. The airtight sump cover guide covers the parts in more detail.
Fit the check valve above the lid
The check valve belongs on the discharge line, above the lid. It stops water in the riser from draining back into the basin after the pump shuts off, and it stops air from moving down that line into the pit.
On a sealed pit connected to a mitigation system, the second job is the important one. The fan is holding the basin under vacuum; without a check valve, the discharge is a path from the basement into the pit, and part of the fan’s capacity goes to pulling conditioned air. Mount the valve where it can be opened or replaced without dismantling the lid.
Keep the pump and float reachable
A pump that cannot be reached is a pump that will not be maintained, and a failed pump is a flooded basement. The cover needs a way in: a bolted lid, a hinged hatch with its own gasket, or a split lid that lets one half lift clear.
Check the float before the lid goes down. A float that sits against the basin wall because the underside of the lid is too low will hang, and a hung float means a pump that never runs. Check the cord too, because a cable pinched between lid and rim is a short waiting for the next storm.
Measure the pit before you order
Measure the inside dimensions of the basin at the rim, the width of the flat landing the lid sits on, the outside diameter of the discharge pipe, and the position of the cord and any drain inlet. Photograph the pit with a tape measure in the frame so a supplier can check the fit against the actual basin rather than a nominal size.
Then check the rim. A basin with no ledge cannot hold a fastened lid, and a lid that only rests in place cannot be made airtight with sealant alone. Some pits need a collar bolted or cast on first, and that is a job for someone who has done it before.
When the lid becomes a suction point
If the pit connects to drain tile that runs under the slab, sealing it turns the basin into a suction point at no extra drilling. The fan draws from the pit, the vacuum spreads along the tile, and the system depressurizes the same gravel bed the radon was using.
That only works if the seal holds. A leaking lid, an open cord port or a missing check valve gives the fan an easier path, and the suction never reaches the far end of the tile. Drain-tile systems sit in the same $800–$2,500 band as sub-slab work, and they live or die on this detail. The systems guide explains how a suction field spreads and what limits it.
When to call a pro
Call someone if the rim is crumbling, if the basin has no landing to seal against, if the pit is the planned suction point for a new system, or if the discharge needs re-piping to fit a valve. Call someone immediately if the pump has been cycling oddly since a lid was fitted.
The DIY guide covers the jobs that stay within a homeowner’s reach. Sealing an accessible pit with a sound rim is one of them. Rebuilding a rim, cutting a new discharge or tying the pit into a system is not, because a mistake there either floods the basement or quietly defeats the radon system it was supposed to support.
A sealed lid is a small piece of hardware doing two jobs at once. Buy one that fits, gasket it, seal the holes, valve the discharge, and leave the float free. Then check it with the manometer, because the only seal that counts is the one that still holds when the fan is pulling.
How to do it
- Measure the basin and the rimInside dimensions at the rim, the width of the flat landing, pipe diameter and cord position. Photograph the pit with a tape measure in frame before you order anything.
- Check that the rim can hold a sealA flat, sound landing takes a gasket. A crumbling lip or a basin with no ledge needs a repair collar or a different approach before a lid will hold pressure.
- Fit the gasket and clamp evenlySet the compressible gasket on a clean rim and pull the lid down with fasteners spaced around the perimeter. Two screws on opposite corners will not compress a gasket evenly.
- Seal every penetrationA grommet or bulkhead fitting for the discharge, a sealed cord grip for the pump cable, a plug or seal for any drain inlet. A lid with three open holes is not airtight.
- Mount the check valve above the lidFit it on the discharge so water cannot drain back and air cannot be pulled down the line. Confirm it can be opened or replaced without removing the lid.
- Clear the float, then test the sealMove the float through its full travel and route the cord clear of the rim. With the system running, check the lid joint and each port; a falling manometer offset means a leak.
Frequently asked questions
What do I need to seal a sump pit lid properly?
A rigid lid with a compressible gasket, fasteners that pull it down evenly against a flat rim, a grommet or bulkhead fitting for the discharge pipe, a sealed cord grip, and a check valve on the discharge above the lid. Sealant helps on a rough rim but cannot replace the gasket.
Can I just caulk the lid down instead of using a gasket?
No. A bead of sealant alone cracks out within a season as the lid and rim move at different rates, and it cannot be reopened for pump service without destroying the seal. Caulk is a backup on an uneven rim, used with a gasket, not a substitute for one.
Why does the check valve matter on a sealed pit?
It stops water in the discharge line from draining back into the basin, and it stops air from moving down that line into the pit. On a pit tied into a radon system, that second job protects the vacuum. Without it, the fan pulls conditioned air down the discharge instead of soil gas from the drain tile.
How do I measure a sump pit for a new lid?
Measure the inside dimensions of the basin at the rim, the width of the flat landing the lid sits on, the outside diameter of the discharge pipe, and the position of the cord and any drain inlet. Photograph the pit with a tape measure in frame so the supplier can check the fit against the actual basin.
Will a sealed lid make my sump pump harder to service?
Only if the lid is badly chosen. A bolted lid, a hinged hatch with its own gasket or a split lid all allow service. Check that the float moves through its full travel and the cord is clear of the rim before fastening anything down, and make sure the pump can be lifted out without cutting the discharge.
Can a sealed sump pit serve as a radon suction point?
Often, yes, when the pit is connected to drain tile under the slab. The mitigator seals the lid and draws from the basin, and the vacuum spreads along the tile. It only works if the lid, the pipe port, the cord port and the discharge are all sealed; otherwise the fan pulls room air.
Sources
Some links are affiliate links.If you buy through them we may earn a commission at no extra cost to you. We do not accept payment for rankings. Read the full disclosure.