Can you install a radon system yourself?
EPA recommends a certified mitigator. What DIY installs get wrong: fan sizing, leaks, vent location, electrical, permits. Plus the steps worth doing yourself.
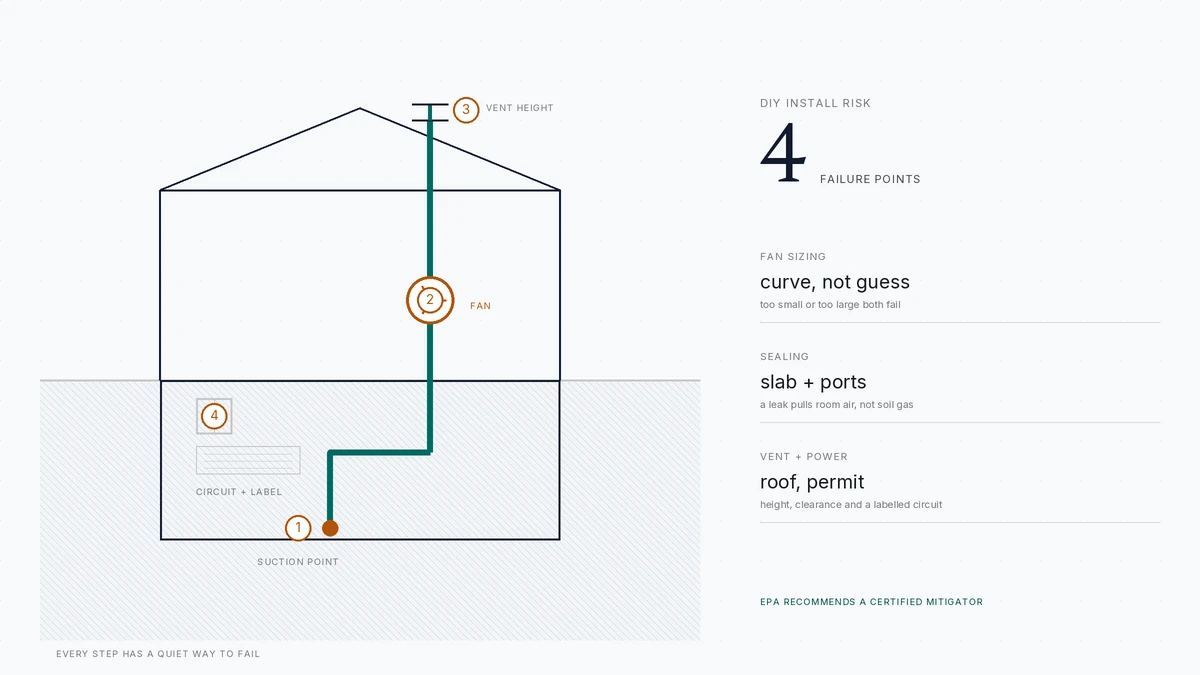
EPA recommends a certified mitigator because the system either holds the soil under negative pressure or it does not, and the failure is silent. Fan sizing, sealing, vent height and electrical work can each fail quietly. Testing and sealing are realistic DIY jobs.
- EPA position
- Use a qualified contractor
- System installed
- $800–$2,500
- Permit, where required
- $0–$150
- Realistic DIY
- Test, seal, swap a fan
Some links on this page are affiliate links.If you buy through them we may earn a commission at no extra cost to you. We do not accept payment for rankings. Read the full disclosure.
| DIY install | Certified installer | |
|---|---|---|
| Design | Chosen by guesswork from a spec sheet | Fan picked from a flow and pressure curve |
| Sealing | Whatever looks closed | Every slab or membrane opening tested |
| Vent termination | Often below the roofline or near a window | Above the roof, clear of openings and intakes |
| Permit and inspection | Usually skipped | Filed where required, with the record kept |
| Proof it works | The fan is running, so it must be fine | Post-install test below 2 pCi/L |
| Warranty | Parts only, if that | Written performance guarantee |
Installing a radon system yourself is the one part of radon work EPA does not suggest a homeowner take on. Testing is a homeowner task, sealing obvious openings is a homeowner task, and a like-for-like fan swap is within reach for anyone comfortable at a breaker panel. Designing and installing a full depressurization system is a different job, because its failure mode is invisible: the fan runs, the gauge shows suction, and the radon stays high.
What EPA actually recommends
EPA’s Consumer’s Guide to Radon Reduction directs homeowners to a qualified contractor, and it points to state radon programs and NRPP certification as the way to find one. Six states license or certify radon professionals — Ohio, Florida, New Jersey, Pennsylvania, Illinois and Iowa — and elsewhere the credential to ask for is NRPP certification.
The recommendation is not gatekeeping. A mitigation system is a pressure problem with a diagnostic step at the end. The installer has to read the suction field, choose a fan from a performance curve, seal a slab or a membrane, route a pipe through a building envelope, terminate it above the roof, and then prove the result with a test. Each of those steps has a specific way to fail quietly.
What the installation involves
Start with the suction point: a core through the slab, or a pit dug beneath a crawl-space membrane, connected to the gravel or soil below. Then the pipe — 3-inch or 4-inch PVC, run inside the house through closets and a roof penetration or outside up a wall, with a slope back toward the suction point so condensation does not collect in a low spot.
Then the fan, mounted where it can be serviced, wired to a circuit, and joined with flexible couplings so it does not transmit vibration into the framing. Then the U-tube indicator, the system label, the sealing of every opening in the slab, and the test that proves the assembly works.
| Stage | What it decides |
|---|---|
| Suction point | Whether pressure reaches the whole footprint |
| Pipe route | Where condensation collects and where the vent ends |
| Fan selection | Whether the field holds under negative pressure |
| Sealing | Whether the fan pulls soil gas or basement air |
| Test | Whether any of the above actually worked |
A crew that has done the job two hundred times still spends most of a day on a straightforward basement. The time is in the sealing and the diagnosis, not the pipe.
Fan sizing is a calculation
The fan is not chosen by house size or by price. It is chosen by the airflow it can deliver at the static pressure the suction field presents, which is why manufacturers publish a curve rather than a single number. A fan that is too small cannot hold the field down. A fan that is too large pulls harder than the slab and pipe need, draws more power, runs louder and does not lower the number further.
A first-time buyer usually picks by wattage or by the loudest spec sheet, because the curve is the part that takes experience to read. Residential units draw 60–90 W and cost about $127 a year to run at the August 2026 US average of 18.16 cents per kWh. A wrong pick costs the price of the fan twice: once to buy it, once to replace it.
Leaks and short circuits
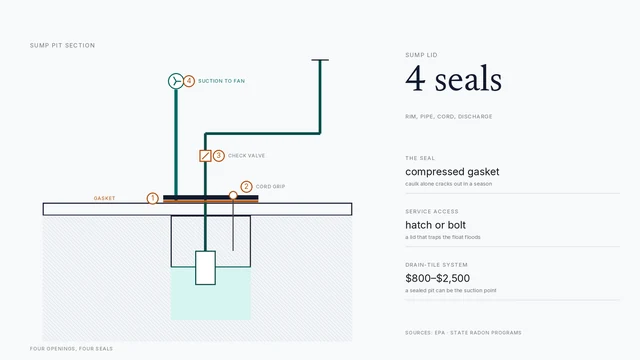
The system works only if the fan pulls soil gas rather than basement air. Every opening in the slab is a path for room air: an open sump pit, a floor drain, a crack at the wall, a redundant radon stub, a pipe penetration that was never sealed. Each one short-circuits the field, and the gauge still shows suction because the fan is moving air somewhere.
On a crawl space the same logic applies to the membrane. A seam taped on one side, an edge stapled rather than sealed, a pier wrapped loosely — each is a leak, and a single one can carry most of the airflow. This is the work that separates a system from a fan in a pipe, and it is the part a first-time installer most often underestimates.
The vent termination
The discharge has to end above the roofline, clear of windows, doors and any air intake, and it has to be supported and flashed where it passes through the roof or wall. A pipe that stops at the siding, under a soffit or beside a bedroom window puts the gas back where it came from.
The rules are not decorative. EPA guidance and local code both address termination height and clearance, and an inspector will look at it. This is also the failure a neighbour notices first, because a vent that ends at eaves height puts a plume where people walk.
Electrical work and permits
Most mitigation fans run on a dedicated circuit, and many jurisdictions require a permit for the work. Permit costs run from nothing to about $150 depending on where you live, and the inspection is the point of it: it checks the electrical connection, the labelling and the termination.
Doing the electrical work yourself without a permit creates two problems. The first is safety. The second is the record, which matters at resale, when a buyer’s inspector finds a fan wired to an unswitched junction with no label and asks who installed it and when.
Insurance, resale and the paper trail
A professional install comes with a written performance guarantee, a labelled system, a permit record and a post-install test. Those four documents are what a buyer’s agent asks for, and what an insurer wants to see if a roof penetration or a wet basement becomes a claim.
A homeowner install has none of them unless you create them yourself. That is not a reason to avoid every DIY task, but it is a reason to be honest about what a self-installed system is worth at the negotiating table. The DIY guide covers the tasks that carry no such baggage.
The DIY work that does pay off
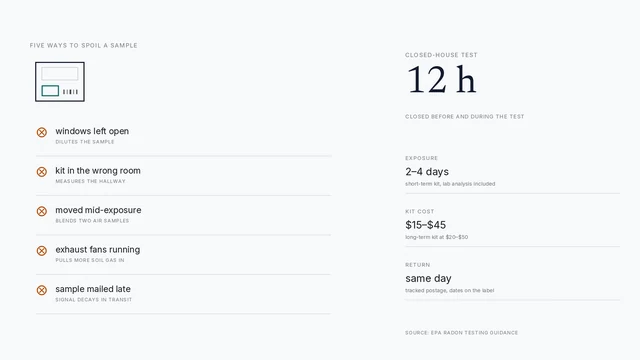
Testing comes first. A short-term kit costs $15–$45 with lab analysis, and it is the only way to know whether a system is needed. Sealing obvious openings comes second: an airtight sump lid, caulk at slab cracks and around pipe penetrations, a gasket on a floor drain. Those steps are cheap, reversible, and useful whether or not a system follows.
A like-for-like fan swap is the third. Same model, same pipe size, power off at the breaker, two couplings, airflow arrow pointing away from the house. It takes an hour of careful work and it is genuinely within reach. Anything that changes pipe size, adds a suction point or runs a new circuit is a different job with a different risk.
The honest arithmetic
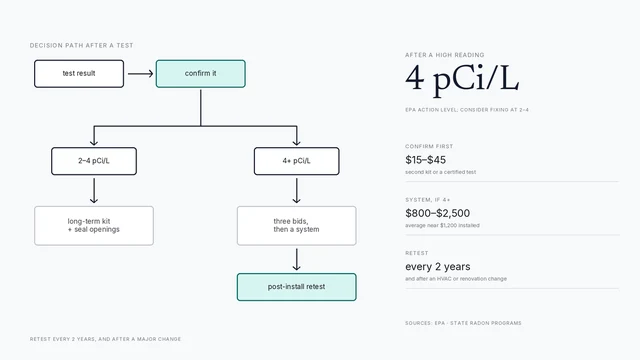
A full system runs $800–$2,500 installed, averaging near $1,200, and a permit adds at most about $150. Set that against the cost of a failed install: a fan that has to be replaced, a slab that has to be re-sealed, a vent that has to be re-routed through the roof, and a test that still reads high at the end. The savings evaporate on the first diagnostic visit.
The foundation-type guide shows how much the design changes between a basement, a crawl space and a hollow-block wall, which is a fair measure of how much there is to get wrong. The testing section covers the measurement that decides everything else.
If the number is high, hire the system and keep the test. If the number is low, seal what you can see and retest in two years. The one outcome worth avoiding is a fan bolted to a pipe by someone learning on the house, with no test to tell them whether it worked.
How to do it
- Test before anything elseA short-term kit at $15–$45 with lab analysis is the only way to know whether a system is warranted. Test in the lowest lived-in level under closed-house conditions.
- Seal the obvious openingsAn airtight sump lid, caulk at slab cracks and around pipe penetrations, a gasket on the floor drain. These are cheap, reversible and reduce entry whether or not a system follows.
- Get three bids with the fan model namedAsk for suction-point count, pipe route, fan model, permit status and whether the post-install test is included. A bid that names no model cannot be compared with another.
- Check the credentialNRPP certification, or a state licence in Ohio, Florida, New Jersey, Pennsylvania, Illinois or Iowa. Ask for the certificate number and check it against the issuing body's directory.
- Leave the fan swap for laterOnce a system is installed and tested, a same-model fan replacement is a realistic homeowner job. Do not start there; start with a system that was designed and proven.
Frequently asked questions
Does EPA recommend DIY radon mitigation?
No. EPA's Consumer's Guide to Radon Reduction directs homeowners to a qualified, certified contractor, and EPA points to state programs and NRPP certification as the way to find one. The recommendation reflects the diagnostic work at the end of the job, not the difficulty of hanging a pipe.
What can go wrong with a DIY radon system?
The common failures are an undersized or oversized fan, an unsealed slab or membrane that lets the fan pull room air, a vent that terminates below the roofline or near a window, and electrical work that is neither permitted nor labelled. Each one leaves a system that runs and looks finished while the radon stays high.
Do I need a permit to install a radon system?
It depends on the jurisdiction. Permit fees run from nothing to about $150, and some building departments require an inspection of the electrical connection and the vent termination. Ask before you buy materials, because the inspection is also the record a buyer's inspector will look for later.
Can I swap a radon fan myself?
A like-for-like swap is realistic if you are comfortable at a breaker panel. Power off, confirm the fan is dead, unclamp two flexible couplings, lift the old unit out, fit the new one with the airflow arrow pointing away from the house, re-clamp and restore power. Watch the U-tube afterward; it should show an offset within a minute or two.
Will a DIY system affect my home insurance or resale?
It can. A professional install leaves a permit record, a system label, a written performance guarantee and a post-install test. A self-installed system has none of those unless you create them, and a buyer's inspector who finds an unlabelled fan with no permit will ask questions that cost more than the installation saved.
What is the one radon job a homeowner should always do?
Test. A short-term kit costs $15–$45 with lab analysis and a certified measurement runs $150–$250. Without a number you cannot tell whether a system is needed, and with a number you can check any contractor's work against it. Sealing obvious openings is the useful second step.
Sources
Some links are affiliate links.If you buy through them we may earn a commission at no extra cost to you. We do not accept payment for rankings. Read the full disclosure.